Patient Instructions: Low-Profile Balloon Gastro-Jejunostomy Tubes (GJ tubes)
These instructions are for Children’s Hospital of Philadelphia (CHOP) patients with low-profile balloon GJ tubes, such as MIC-KEY® or G-Jet®. They may also be called button GJ tubes.
Important information:

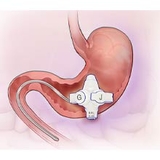
GJ tube placed in the stomach with J tube extending into the small intestine. are two tubes in one: a G-tube (gastric tube) in the stomach and a J tube (jejunal tube) in the small intestine. Low profile means the tube lies flat on the belly. These tubes have three ports, or openings:
- The balloon port is used to fill and remove water from the balloon. The balloon inside of the stomach holds the tube in place and prevents leaking. The balloon port should not be used for feeding or medicine.
- The gastric port opens only into the stomach and can be used for medicine or to drain or vent the stomach. Venting is a way to burp your child and remove gas from the stomach.
- The jejunal port opens only into the small intestine (jejunum) and is used for feeding and medicine. This is helpful for children who vomit a lot, have stomach pain during feedings, or aspirate formula into the lungs.
- Both the stomach and intestinal ports have one-way valves that work like trap doors. When the valve is closed, nothing can pass through the tube. To open the valve to give feedings, medicine, or to vent the stomach, a special tube called an extension set must be attached. The extension set connector locks into the ports.
- Depending on the manufacturer, the ports may be on the top of the button, or one on top and one on the side. They will be clearly labeled “G” and “J.”
- Low-profile GJ tubes need to be measured for the correct size and changed every 3-6 months in Interventional Radiology. Call IR to schedule.
- Your child’s tube should not interfere with their normal activities. They can bathe, swim, play and sleep as usual. This kind of tube works especially well for the active child because the tube sits flat on the belly and is easily hidden under clothing.
Instructions for attaching the extension set:
- Hold the GJ tube button firmly between your thumb and index finger. Match up the black line on the extension set with the black line on the low-profile tube.
- Push the extension set connector into the port to be used, and, keeping pressure on the tube, turn it 1/2 to 3/4 of a turn in the direction of the arrow. This opens the valve.
- If the connector does not turn easily, make sure that it is pushed in fully and that nothing is blocking the opening to the feeding port.
- If the tube is turned more than 3/4 of a turn, the valve may break.
- When a feeding or medicine is finished, flush the tube, remove the extension tubing, and close the cap. Removing the extension set can prevent your child from pulling on the tube.
G-Jet tips:
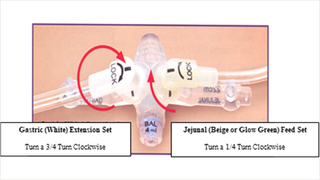
- The gastric and jejunal extension sets and ports are color-coded. The gastric extension set will only fit the gastric (white) port. The jejunal feeding extension set will only fit the jejunal (beige or glow green) port.
- To attach an extension set to both ports of the G-Jet tube at the same time, turn the gastric (white) extension set 3/4 turn clockwise. Turn the jejunal (beige or glow green) extension set 1/4 turn clockwise.

Instructions for cleaning the extension set:
- Wash the extension set in warm, soapy water after each use.
- For a continuous feeding, wash the extension set at least once a day.
- Rinse well and hang to dry.
- Ask your homecare company how many sets you will receive each month. This will let you know how often you can change the extension set.
Instructions for skin care:
A small (1/8 inch) gap between the base of the tube and your child’s skin is normal. This gap allows air to reach the site and makes it easier to clean the area.
- Wash your hands with soap and water.
- Wash around the stoma site and surrounding skin with mild soap and water every day, or more often if needed. Be gentle. Scrubbing can slow down healing or cause skin breakdown. Rinse with water and dry well.
- It is normal to have a little yellow-brown drainage and redness at the opening.
- Gauze or dressings are not necessary.
- The balloon port must also be kept clean as it can trap lint or spilled formula. You may clean it with a cotton swab and water.
Call your child’s healthcare provider if you see:
- Rash with red dots on the edges
- Signs of infection: increased redness, swelling, yellow-green drainage with a bad smell, pain
- Open areas of skin around the stoma
- Bleeding at the stoma site
- Bleeding, painful, or growing granulation tissue around the stoma
- Increased leaking at the stoma site
- Vomiting of formula
- The tube leaves marks on your child’s skin
IMPORTANT: Do not turn your child’s tube.
Instructions for leaking at the stoma site:
- If there is leaking at the stoma site, check the amount of water in the balloon.
- Hold the GJ tube button against the belly and pull back on the balloon port with the syringe that comes in your GJ tube kit. Check the amount of water that you have pulled into the syringe.
- If there is less than the usual amount, add water.
- Keep your thumb on the syringe plunger while removing the syringe from the balloon port. This will keep water in the balloon as you remove the syringe instead of flowing back into the syringe.
- Balloon volumes are different based on size and type of tube. Talk to your healthcare provider about the right amount of water for your child’s tube. If the balloon contains the correct amount of water, but is still leaking, add 0.5 ml to 1 ml of water at a time to the balloon until the leaking stops. Never have more than the maximum recommended amount of water in the balloon. If you add too much water to the balloon, it may break or cause a blockage.
- Your child’s stomach may also need to be vented.
- If leaking continues, call Interventional Radiology.
- While you are waiting to get instructions, you may place a gauze pad or other dressing under the tube. Be sure to change when wet.
- Protect the skin around the stoma with a skin barrier such as Vaseline®, A&D® ointment, diaper cream, or Cavilon™ No Sting Barrier Film (if your child is over 1 month old).
Instructions for treating granulation tissue:
Granulation tissue is a type of scar tissue that forms when the body is trying to heal itself. Because the feeding tube stoma is a new opening, your child’s body naturally may try to close it by growing this tissue. Some children have granulation tissue that grows very quickly, while others have no problem with it at all. Granulation tissue is dark pink or red. Sometimes it can cause leakage and skin irritation. It may also bleed or cause pain. If this happens contact your healthcare provider.
- If you see granulation tissue starting to grow, discuss it with your healthcare provider at your next visit.
- If the granulation tissue around the tube is bleeding, painful, or growing quickly, contact your healthcare provider for an appointment. They may prescribe a cream that you can use at home, or they may treat it in the office with a medicine called silver nitrate. These medicines shrink the granulation tissue. Granulation tissue may return and need to be treated with medicine again.
Instructions for venting the gastric port:
J tubes do not need to be vented, but G tubes may need to be. Venting is a way to use the tube to burp your child and let gas out of their stomach. Your child may need to be vented if their belly is bloated, if they have belly pain, or if they gag, retch, or vomit.
If your child’s G tube needs to be vented, follow these steps:
- Insert an extension set into the gastric port.
- Remove the plunger from a catheter tip syringe.
- Attach the syringe barrel with the plunger removed to the gastric extension set.
- Hold the syringe barrel above the level of your child’s stomach.
- Keep the tube vented for 5-10 minutes before and after feeding and as instructed.
Instructions if the tube becomes clogged:
- Try to prevent the tube from clogging. The J tube can clog easily and needs to be flushed with 5-10 ml of water every 2-4 hours throughout the day, even on continuous feedings and before and after all feedings and medicine. The G tube needs to be flushed at least once a day.
- If the tube becomes clogged, attach a 5ml oral syringe with warm water to the end of your feeding tube. Try to flush the tube. If you are unable to flush, pull back the plunger of the syringe. Repeat this push and pull action up to 5 times. If you still cannot flush the tube, try using warm water in a 3ml or 1 ml syringe and repeat the above steps.
- If you still cannot flush the tube, use the Clog Zapper® kit as you were taught. Clog Zapper is a ready-to-use kit containing powder that helps break up clogs in feeding tubes. Clog Zapper contains maltodextrin, a type of sugar. If your child is on a ketogenic diet, they will need microlipids once the tube is unclogged. Talk to your healthcare provider about how much to give. Clog Zapper also contains coconut and should not be used in those with tree nut allergies.
- If this does not work, call Interventional Radiology.
Instructions if the GJ tube comes out:
No matter how long your child has had a GJ tube, the stoma can close very quickly.
- Put water-soluble lubricant on the end of the tube. Insert the end of the tube into the stoma about 1 to 2 inches. Do not force the tube if you meet resistance. Tape the tube in place. The tube will keep the stoma from closing.
- Do not feed your child through the tube.
- Call Interventional Radiology right away.
Call your CHOP team with any questions or concerns.
If you have any questions about your child’s health, please contact your child’s healthcare provider. This document is intended only to provide general educational information and is not intended as medical advice or treatment. Please consult with your healthcare provider prior to use, as some of this information may need to be adapted for your child’s specific needs. It is the responsibility of your healthcare provider to advise you on the appropriate use of this information. If you/your child are not already a CHOP patient, this document does not create a doctor-patient relationship between you/your child and CHOP. CHOP is not responsible for any outcomes you/your child might experience from your use of this document. This document is provided "AS IS", WITHOUT WARRANTIES OR CONDITIONS OF ANY KIND, express or implied. If this document refers to any drugs or medical devices, it is the responsibility of your healthcare provider to check the FDA status prior to use. If this document includes references to drug dosing, please do not rely on this document. Your healthcare provider should check the package insert for each drug before use. Hyperlinks used within this document may not be translated into other languages.
©2022 Children’s Hospital of Philadelphia. Not to be copied or distributed without permission.